Expand any of the tabs below to learn more about the Flight Tracker project evolution, or jump to any of the tabs above for live information from the tracker.
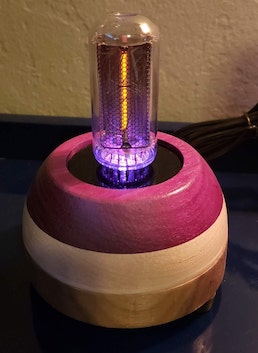
I can trace the seed for this project back to a visitor to my booth at the Mountain View Art & Wine Festival in 2018, who asked me if I had built any Nixie clocks. At the time, the answer was no - I had no idea what that was - but within a year, I had one design and a few sales. Shortly after building those, I wanted to feature the technology with a blog post; in researching and writing this, I found three other “pre-digital display” technologies that also caught my eye and for which I wanted to incorporate in some TBD personal or commissioned projects: the single plane display; the flipdot display; and the splitflap display.
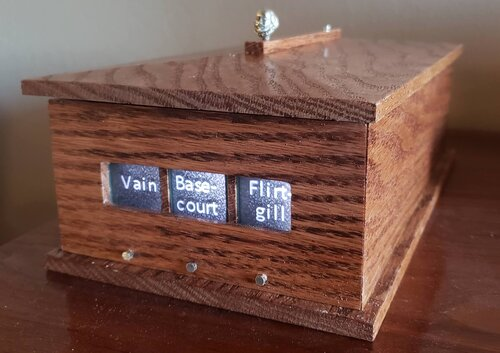
I started in on the easiest of those three: I procured some 1950s-era single pane displays from eBay that ultimately ended up in a Shakespeare Insult Generator; I looked into purchasing some flip dots assemblies but failed to find a compelling (and supported) product; and I stumbled upon a kickstarter-ish program from a then-recently-formed company called Vestaboard for the splitflap display.
So I took a gamble, putting down a 50% deposit for a board that would be delivered in mid-2020 (now, late-2020), over a year away, and for about nine months, I hardly thought of it.
The Shakespeare Insult Generator displays one of a thousand possible combinations of insults each time the Bard's head is touched.
But this purchase was much much larger, both in size and in cost than the Nixie tubes or a single pane display. Though the specifications were not final at the time, it was expected to be roughly the size of a 40” TV (and the cost of a 60” TV). Perhaps the bigger gamble was that, for something so large, I had absolutely no idea what I was going to do with it! I just knew I loved the mid-century look and sound of it, and held out hope I’d find some unique way to use it.
Vestaboard committed early on to a few “out-of-the-box” integrations, such as Google Calendar, or an inspirational quote-of-the-day. And as their production date has neared, those integrations have expanded significantly, to Slack, and to the many apps that are available with IFTTT (If This Then That, a freeware web-based service that allows easy integration of chains of simple conditional statements across multiple platforms and devices).
Some of those applications make for a great corporate lobby or boardroom display, or as a perfect tool to help aid team coordination. But none of those spoke to me. I want something uniquely local to me, my home, my location. Earthquake reports nearby? How much power I have generated with my rooftop solar? How many cars have driven by my house? Local air quality index as measured from my backyard?
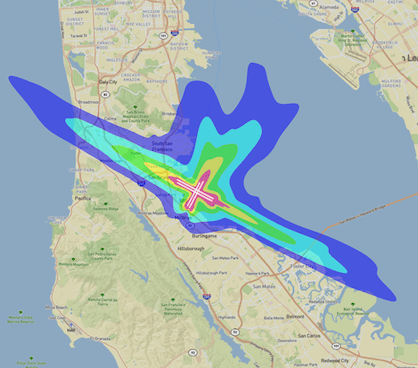
All of these are more in line to what I’m aiming for, but none were particularly interesting to display in some ongoing fashion on a large messageboard. Then, one morning, it strikes me: I live near the SFO flight path. So near, in fact, that SFO has paid to upgrade my windows to provide better soundproofing for my (and a thousand or so other) home via a decades-long program.
Over the years I’ve lived here, friends and family - and even, still, occasionally myself - look up at the sky trying to find, or identify, or guess the destination of, a flight that sounds so close it causes conversations to be put on pause. Occasionally, someone curious enough to scratch that itch even more will quickly look up the flight on FlightAware or FlightRadar and get additional details on the flight, or to confirm an educated guess.
This noise pollution map uses different colors indicate the decibels; I’m right at the boundary of the yellow & green zones.
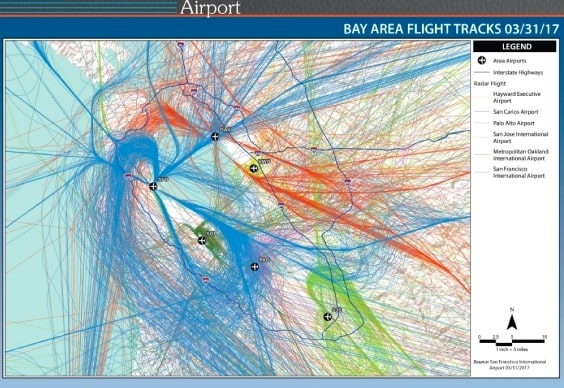
Flight activity for one arbitrarily-mapped day, with different colors representing different airports. I tend to get predominantly flights going due south heading to southern California or the Pacific southwest, or flights going WNW for the international traffic going directly out over the Pacific Ocean.
So wouldn’t it be cool if I could get that flight info on a display just before the rumble invades my house? This potential application ties in with the splitflap display for potentially a second reason as well - though I love the sound of the splitflap display board, I do expect that after a few months of it, I might not find it quite as enjoyable. But it would be at least partially drowned out with the noise of the airplane overhead - something that despite my SFO-funded window upgrade is still not wholly mitigated.
I’m reasonably proficient coding in a couple languages. But I knew next to nothing about how to accomplish my flight tracking vision.
This is the part I truly enjoy in any project: learning just enough about a system, a tool, a process, to start using it and integrating it with other systems. That is, I like learning “just enough to be dangerous”. I could have never sustained the years-long deep focus on a narrow topic to get myself a PhD, but I think I was a pretty good program manager or project manager where being a “jack of all trades, master of none” comes in handy.
So I start exploring a few ideas: perhaps I can web scrape or use the web services of any of the existing commercial flight tracking sites as flights go overhead. But as I play with the website, it seems there is a couple second delay between the flight and it’s location on the website; given the additional multi-second delay it will take for the message to show up on the board, I need to minimize any latencies. Further, web scraping is definitely out, at least as the primary solution, since there’s no way to geofence the scraping - that is, to answer a question like “tell me about a flight only when it comes within one mile of my home”. Using the web services of those sites are a potential option, albeit at a rough cost of $60+/month.
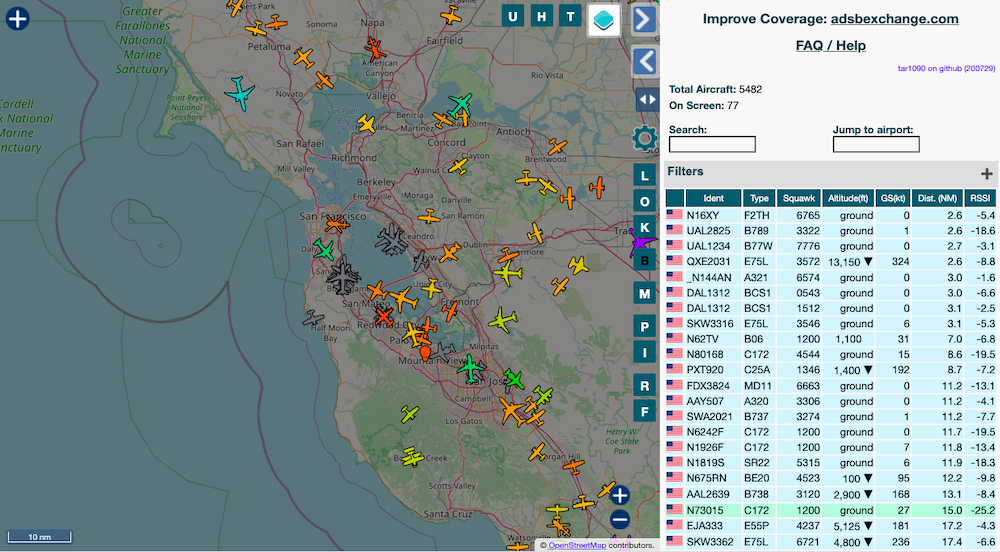
But my reading introduces me to ADS-B (automatic dependent surveillance - broadcast), and in turn, to the site adsbexchange.com, “the worlds largest co-op of ADS-B/Mode S/MLAT feeders, and the world’s largest public source of unfiltered flight data.” ADS-B is a surveillance technology in which an aircraft determines its position via satellite navigation and periodically broadcasts it, enabling it to be tracked. As of 2020, all aircraft operating in the US airspace are required to carry equipment that transmits an ADS-B signal readable by ground-reading equipment.
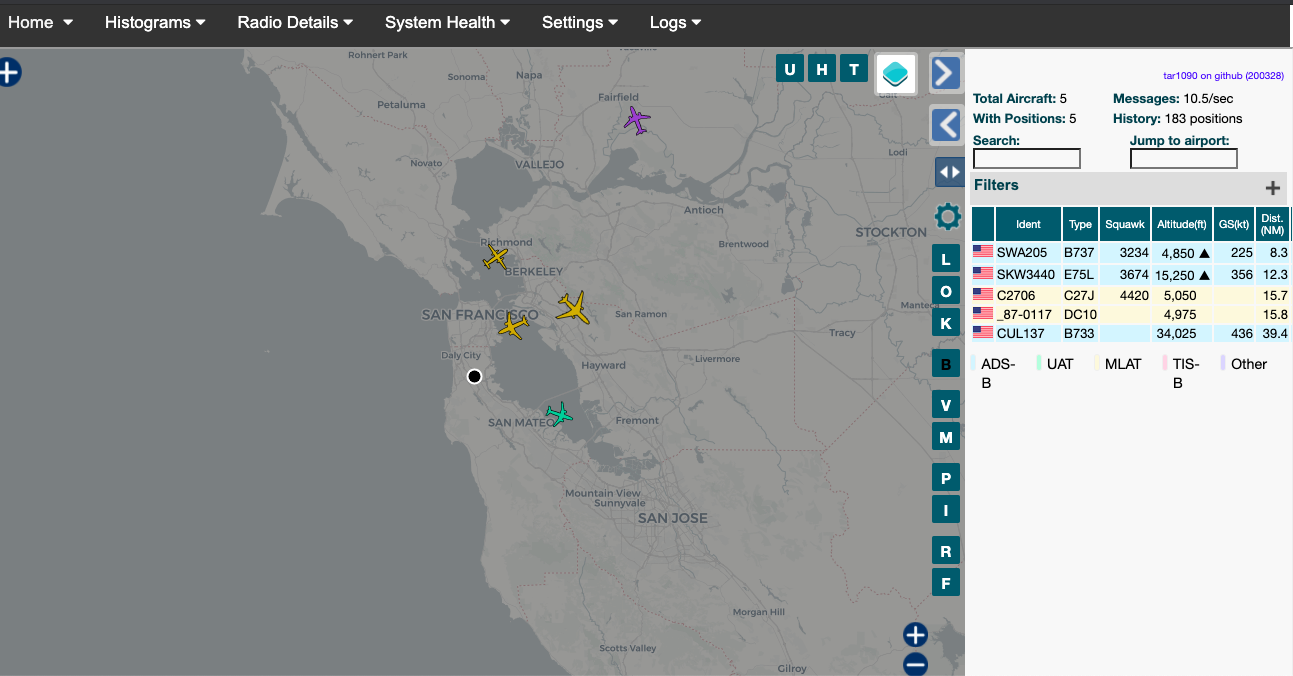
While the map here is conceptually similar to what you’ll find at any of the commercial flight tracking sites, as I learn that the data is fed completely by individuals with their own radio receiver gets me wondering how hard can it be?!
Stepping back for a moment, what does an ADS-B message look like? Not to get too technical, but by the time the ADS-B Exchange library finishes with some preprocessing, it’s a JSON (JavaScript Object Notation) message that looks like the following:
The most common message, however, is something that looks like this, indicating that no aircraft are currently in range.
{
"now" : 1594179826.7,
"messages" : 5400,
"aircraft" :[]
}
I’ve left out a number of fields, including loads of information about the signal accuracy. You can read about a few of those here.
The main part of the message is actually fairly straightforward to interpret:
A timestamp for the message based; this is the Unix “epoch”, the number of seconds that have elapsed since an arbitrarily selected (but well-defined) point in the past.
One or several flight identifiers touniquely identify a single aircraft. I have seen both a squawk code of a specific flight number change mid flight, and a flight number of a specific squawk change mid flight, but between the two of them (or alternatively, via the more stable hex identifier), a flight can be tracked across multiple radio messages.
Potentially aircraft position and trajectory details, such as the altitude as derived from one of two sources; the ground speed; the trajectory; the ascent or descent rate, and the latitude and longitude
Metadata about the radio signal: the strength of the radio transmission; since it’s continuously transmitting and updating (while in air) every second, when was the last message received, and how many have been received.
One of my favorite fields, the object “category”; while I’ve been unable to get a complete list of all categories, a few of the more interesting ones are:
A4 = High Vortex Large (aircraft such as B-757)
A5 = Heavy (> 300 000 lbs.)
A6 = High Performance ( > 5 g acceleration and > 400kts)
A7 = Rotorcraft
B1 = Glider/sailplane
B2 = Lighter-than-Air
B3 = Parachutist/Skydiver
B4 = Ultralight/hang-glider/paraglider
B6 = Unmanned Aerial Vehicle
B7 = Space/Trans-atmospheric vehicle
C3 = Fixed Ground or Tethered Obstruction
I haven’t yet picked up any parachutist transmissions, trans-atmospheric vehicles, or tethered obstructions, but I have gotten a handful of helicopters (i.e.: A7) flying near to my house.
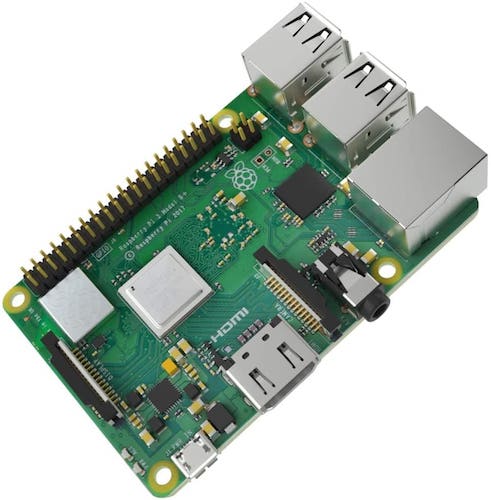
It is this signal that forms the foundation of my project. It turns out an inexpensive radio (about $20), coupled with an inexpensive antenna (about $10), can receive signals for tens of miles in any direction. Coupled with a Raspberry Pi - a fully-functional but minimalist Linux-based computer available for about $45 - I’m off to the races.
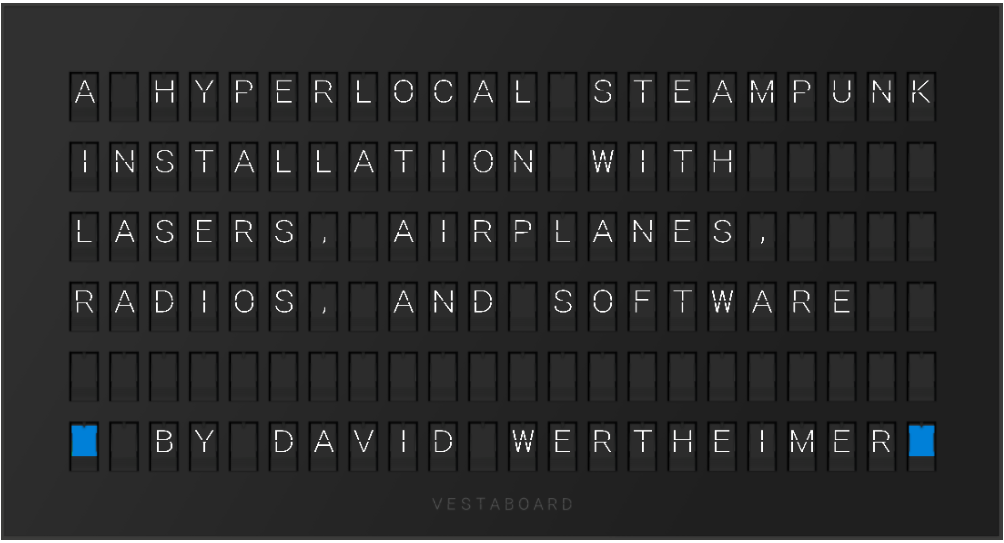
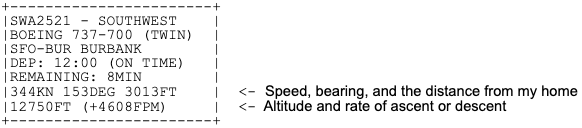
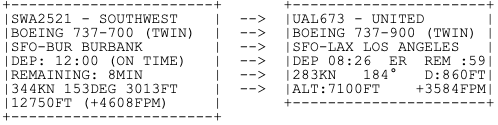
By mid-February 2020, I had a Raspberry Pi with an ADS-B receiver able to receive these signals and contribute to the adsbexchange community. My goal was to use this signal to do some geofencing, augmenting the data with additional flight data to display an interesting message about the flight on the splitflap display, to produce something like:
By mid-March 2020 - about two weeks after starting in earnest - I was able to reliably generate a message like this, with about $75 of parts.
The bare-bones configuration: a Raspberry Pi, an antenna, a software-defined radio (SDR), and - not visible - a robust power supply.
But then, two symbiotic things happened: scope creep, and the COVID-19 pandemic.
Anyone who has ever built literally anything knows about scope creep: “If we’re remodeling the kitchen, we might as well also ...” The pull to add just a little more is just the same with software; in fact, it’s probably worse, since - other than the opportunity cost of time - there’s much less physical “real” cost to software changes. Or at least the costs (support, debugging, documentation, etc.) are less visible for software than steel, concrete, tile, and the like.
With California being early and aggressive with a shelter-in-place, leading to the cancellation of all the art shows for my business, and the drying up of commissioned projects and consulting work, I have nothing but time, and nowhere to go. So the scope grew. And grew and grew and grew.
For a sampling of how this internal conversation went, read on!
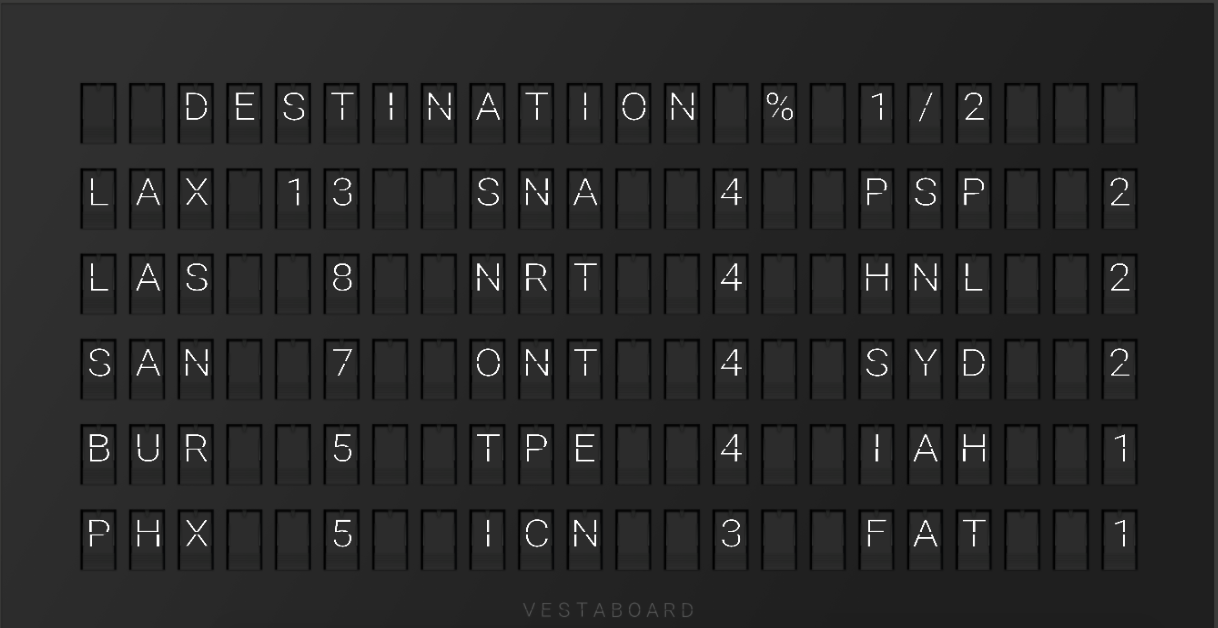
Since I’m collecting all the flight info of dozens of flights as they fly overhead, if I start building a repository of it over a few weeks, I can do lots of nifty stuff with it. I can generate histograms, both for the splitflap display, and for some to-be-built web portal.
One of about a dozen different types of histograms that can be displayed on-demand for the splitflap display, based on data of the last day, week, or month. Monthly histogram graphs are also refreshed at the end of every day here.
I can also start generating more interesting messages, such as the first time a unique destination is seen in a few weeks, or calling out the fastest plane, or the most delayed flight number or time of day. I ultimately build the logic for twenty two distinct types of flight “insight” messages, though of course most flights only trigger one or two and many flights don’t trigger any at all.
Flight last seen: KAL214 was last seen 2d0h ago
Different aircraft: Last time ASA1964 was seen on Mar 16, it was with a much larger plane (Airbus A320 (twin-jet) @ 123ft vs. Airbus A319 (twin-jet) @ 111ft)
Repeated destination: ASA1337 was the 4th flight to PHX in the last 53 minutes, served by Alaska Airlines, American Airlines, Southwest and United
Speed superlative: N5286C has the slowest groundspeed (113mph vs. 163mph) in last 24 hours
Altitude superlative: CKS828 has the highest altitude (40000ft vs. 16575ft) in last 24 hours
Ascent rate superlative: UAL631 has the fastest ascent rate (5248fpm, 64fpm faster than next fastest) in last 24 hours
First destination: NQ1023 is the first time destination HMB (Half Moon Bay) has been seen since 14d7h ago
First origin: AY5525 is the first time origin LHR (London Heathrow) has been seen since 12d9h ago
First airline: PCM8679 is the first time airline Westair Industries has been seen since 9d0h ago
First aircraft: N311CG is the first time aircraft GLF6 (Gulfstream Aerospace Gulfstream G650 (twin-jet)) has been seen since at least 7d5h ago
Longest delay: This 2h17m delay is the longest UAL1175 has seen in the last 9 days (avg delay is 4m)
Flight number delay frequency: With todays delay of 7m, UAL1175 is delayed 88% of the time in the last 8 days for avg delay of 1h19m
Flight number delay time: Flight SIA31 (n=7) has a delay frequency in the 95th %tile, with 100% of flights delayed an average of 6m over the last 4d1h
Airline delay frequency: With this delay of 34m, United is delayed 92% of the time in the last 8 days for avg delay of 1h19m
Airline delay time: Airline Southwest (n=37) has a delay frequency in the 3rd %tile, with 7% of flights delayed an average of 6m over the last 14d1h
Destination delay frequency: With this delay of 19m, LAX is delayed 92% of the time in the last 8 days for avg delay of 1h19m
Destination delay time: Destination TPE Taipei (n=19) has a delay frequency in the 9th %tile, with 10% of flights delayed an average of 27m over the last 8d12h
Hour delay frequency: With this delay of 28m, the 7PM hour is delayed 92% of the time in the last 8 days for avg delay of 1h19m
Hour delay time: The 6AM hour (n=31) has a delay frequency in the 9th %tile, with 10% of flights delayed an average of 3m over the last 8d12h
Date delay frequency: With this delay of 3m, the 5th is delayed 3% for avg delay of 7m
Date delay time: The 9th (n=58) has a delay frequency in the 89th %tile, with 73% of flights delayed an average of 42m over the last 28d12h
Helicopter: N376PH with a Eurocopter EC-635 (twin-turboshaft) is the 4th helicopter seen in the last 30 days.
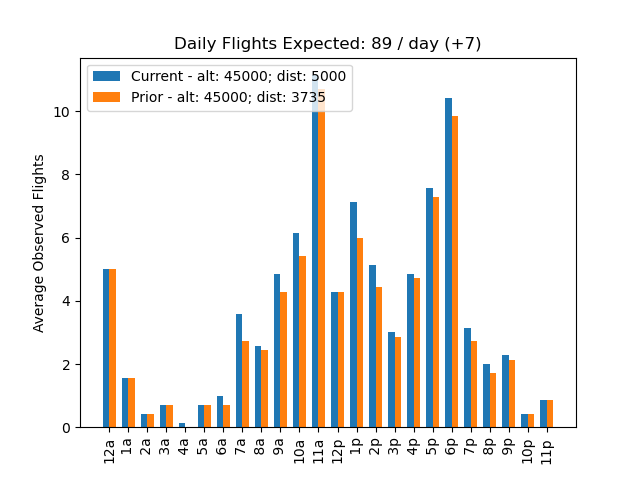
This histogram shows the before and after of flight frequency by hour, as I try changing the main geo fence criteria of altitude and (forecasted) minimum distance to my home a plane will be based on its bearing and location.
And of course, I need to be able to control the sensitivity of the geofence - dial it down, turn it off over night, etc.; in order to set the geofence intelligently, I also need some data to help me understand the impact of changes.
And I might want to interleave personal messages - WELCOME TO SAN FRANCISCO, MOM & DAD - with the flight details. Or I might just want to see the bare-bones basic info on a smaller (and silent) digital display to still get the insight as a flight goes overhead, but to not have an otherwise quiet evening further interrupted by the flipping characters.
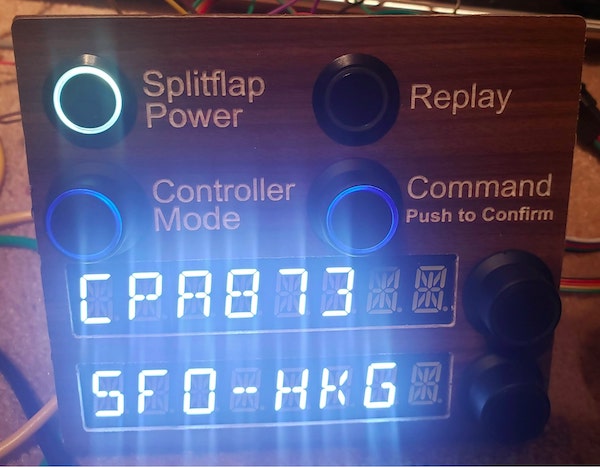
All these controls and information obviously require some sort of remote control - while a web portal is great for even more detail, I want something tactile that does not require fumbling with controls on a mobile screen. Of course a remote control needs some sort of wireless communication, and to have some sort of independent power source for a power hungry radio and display.
The remote control, after electrical test but before final assembly.
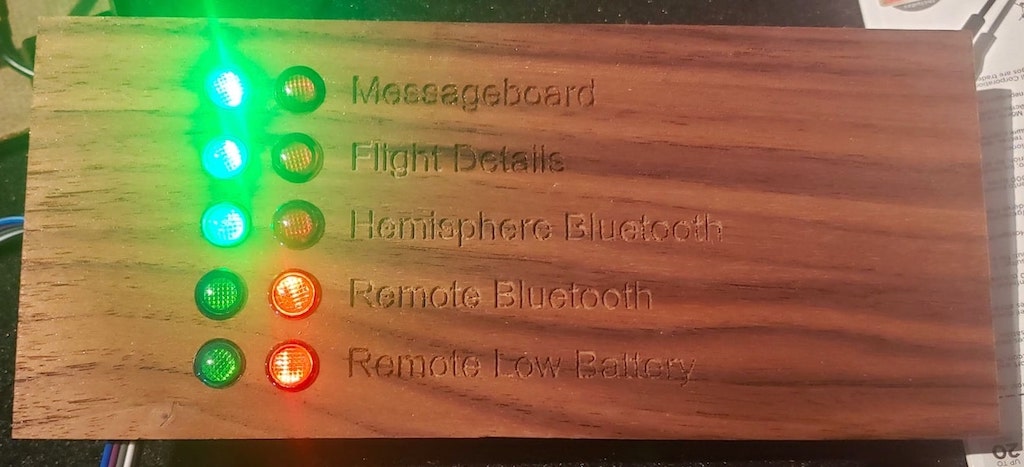
The indicator lights on the central processor unit, also after electrical validation but before the casework; the first two lights are related to communication with external web services, while the next two show the status of the local bluetooth connections.
As I’m debugging, additional needs come to the fore. A lot of problems can be avoided if I get immediate visibility into some key external systems - such as my internet being down or the Vestaboard API being unavailable, so I want some user-friendly status lights. And debugging becomes much easier if I can profile the code, restart the service, or record data for future simulation, all thru a web interface. Tracking code changes and correlating the code errors with code versions becomes more important as both the project size grows, and as some types of errors become more difficult to reproduce with now multiple interacting microcontrollers and radio systems.
This excerpt from the status report shows the date and time of recent faults, and in some cases, the cause or at least the error message generated; it also links to the code that was running at the time with code deltas from prior versions.
Oh and that earlier-mentioned web-portal? Let’s make it kind of interesting, useful not just for myself to debug and maintain and control, but also with insight for others to see both the technical evolution and functionality of the system, with pretty pictures and colorful dashboards, live maps and simulators and the like.
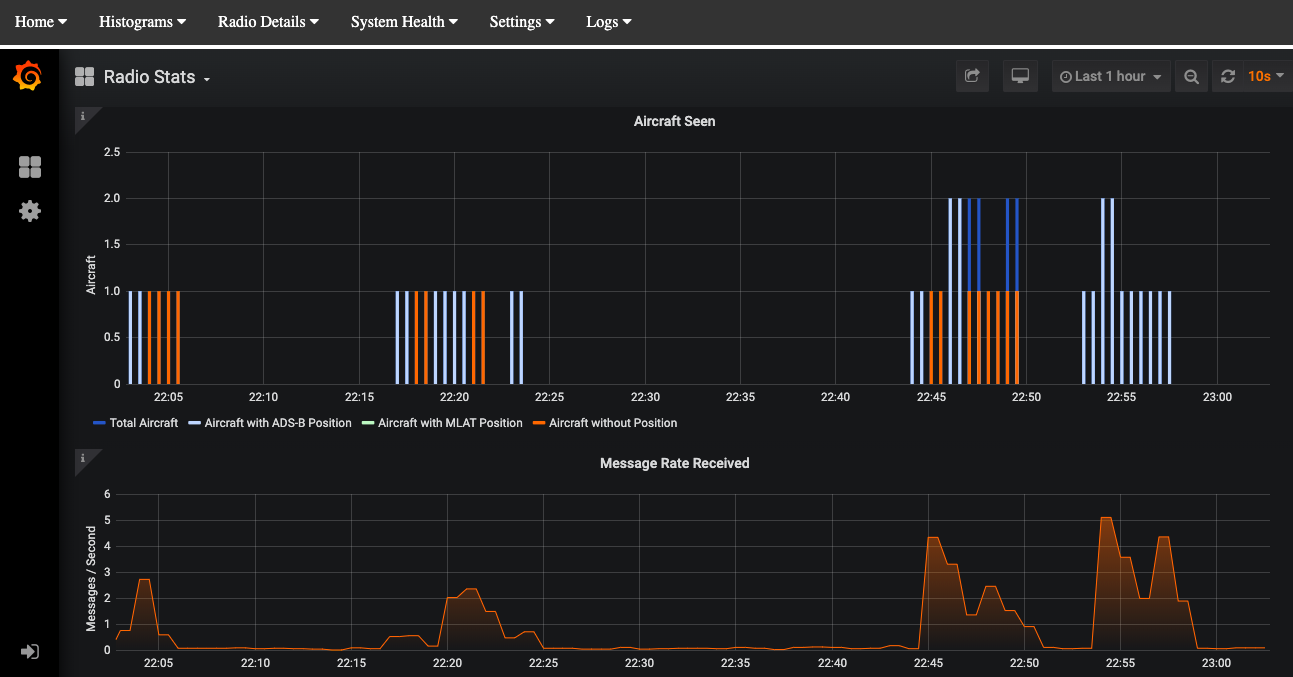
Real-time and recent historical details from the radio, such as how many flights it is picking up, its range, and so on.
If you've ever used FlightAware, FlightRadar, or a similar service, you'll be familiar with this type of map. But a key difference between those sites and this map is that this map shows only planes picked up by my radio.
And then, from left field, another feature set comes to mind: with real-time position, I can build a tracker to show where in the sky the plane is, even if it’s not visible due to cloud cover, darkness, or my own roof. And since I need an opaque dome to protect wandering eyes from the laser light, this is also a great place to hide some RGB lighting for a low-key mood light when not in use for flight tracking.
Over 10,000 lines of code later, you get the idea. Afterall, all I have is time!
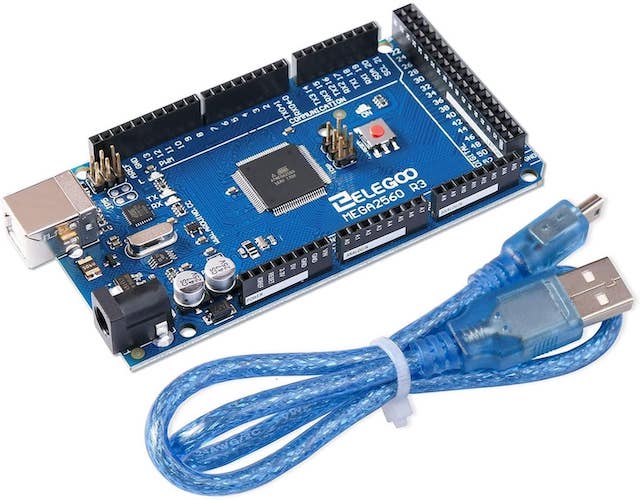
I earlier mentioned the Unix-based Raspberry Pi and the ADS-B radio receiver. The remote control and the laser tracker are each controlled by an Arduino Mega, an independent low-cost programmable microcontroller. Each of these in turn is connected to the RPi via bluetooth using an HC-05 serial bluetooth module.
Raspberry Pi; this is the mini-computer that serves as the main controller.
Arduino Mega; there's one of these in the remote control, and one in the laser hemisphere.
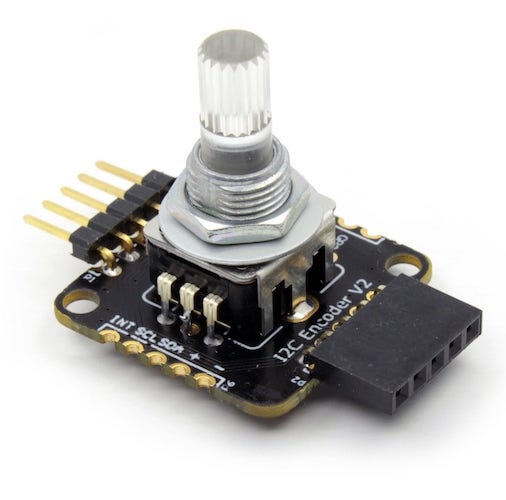
Lighted encoder switch; there's a few of these in the remote control.
The inductive (wireless) charger that keeps the remote control running; one half is in the main controller, and the other half is in the remote control. The shape of the custom-made wood assemblies keeps the coils perfectly lined up.
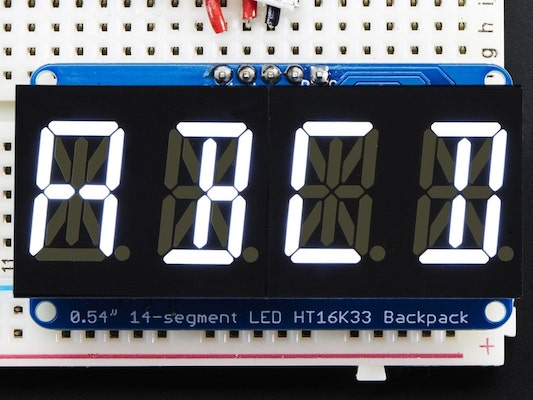
There are four of these displays in the remote control; though they are available in several colors, the bright white evokes an airplane cockpit aesthetic.
The rechargeable lithium polymer battery in the remote needs a controller to make sure it does not get overcharged, and to convert the 5v from the inductive charger to the 3.2v max of the battery.
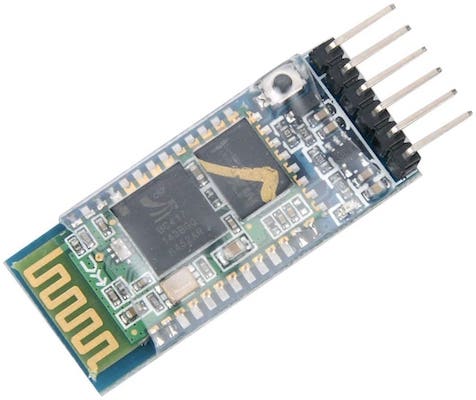
A pair of these bluetooth radios - one for the remote, and one for the laser hemisphere - communicates with the built-in bluetooth radio of the Raspberry Pi.
The RPi and the laser tracker each have a mix of 12V and 5V systems. For instance, the Raspberry Pi and the cooling fans operate at 5v, whereas the inductive charger, the indicator lights, and the RGB LED strip operates at 12V. The three lasers (red, green, and blue) require even additional voltages - 3.3V and 7.0V - so I end up needing a lot of different power regulators and MOSFETs as well. I use two robust 12V power supplies for the RPI and the tracker, with several buck voltage regulators for the different subsystems.
The remote control requires just a single 5V source, and its main source of power is a lithium polymer battery which is continuously recharged wirelessly when the remote is sitting in its cradle on top of the main RPi system.
A components list including all the “big” items, but excluding wood, screws, wiring harnesses, and the like is as follows. The scope creep took the cost well beyond the initial $75. But if I consider it my “entertainment” in lieu of bar tabs and concert tickets, it’s actually pretty economical way to keep myself entertained and engaged for a few months.
This allows me to expose the two remaining open RPi USB ports on the outside of the case, so I can potentially attach a keyboard or other troubleshooting without opening up the case.
The servos are standard motors mounted on a pan/tilt mechanism; two of the lasers are from a midwest laser company, and the third is from a west coast electronics supply house. The alphanumeric displays are from Adafruit, an east coast company specializing in “maker” electronics and kits. The lighted push button and toggle switches are from China, and the lighted encoders are from Italy.
There are a number of plastic pieces as well that are sourced from all over - the white hemisphere is from Pennsylvania; the accent rings and the cover are from a local supply house, TAP Plastics; the engraved faux walnut control panel on the remote control is from BF Plastics in Ohio.
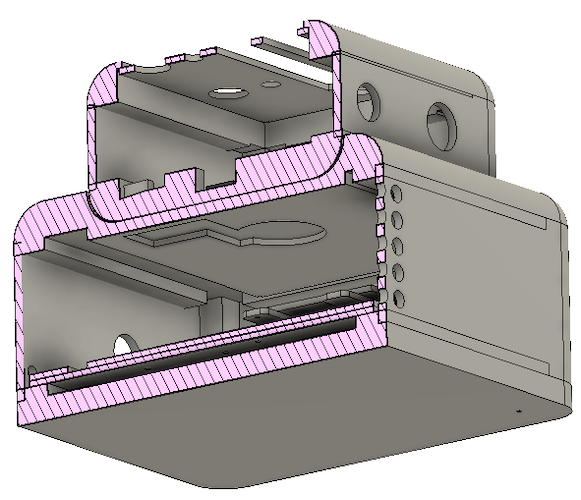
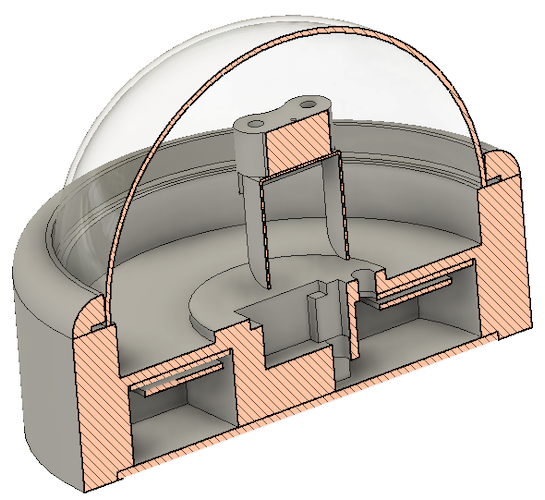
Cross section of the remote (on top) and cradle / main controller (on bottom); the cutouts on the bottom of the remote are for power management, while the straps and cutouts in the cradle are for the radio, backup drive, and wiring harnesses.
Looking up at the same cross section, you can see the cavity for the inductive charging coil (and circuitry) that matches up with the coil in the remote.
Though the hemisphere has less electronics, it was more effort to design and fabricate due to ensuring sufficient freedom for the pan / tilt head with the attached laser modules, and adding a millable surface into which switches and receptacles can be placed.
I mill some walnut pieces for the cases, build a test base of MDF for the hemisphere laser pointer, going thru a few design tweaks as the components slowly arrive or as the design changes (see Scope Creep section, above). I read up on how to do gamma color correction for LEDs. I build wiring harnesses, get assortments of potentiometers, capacitors, and resistors (only the last of which I end up using). I learn how power hungry both the radio and the servos are, steering me towards upgrading the cheap $5 wall wart power supplies I started with to eliminate some pesky bugs from voltage drops.
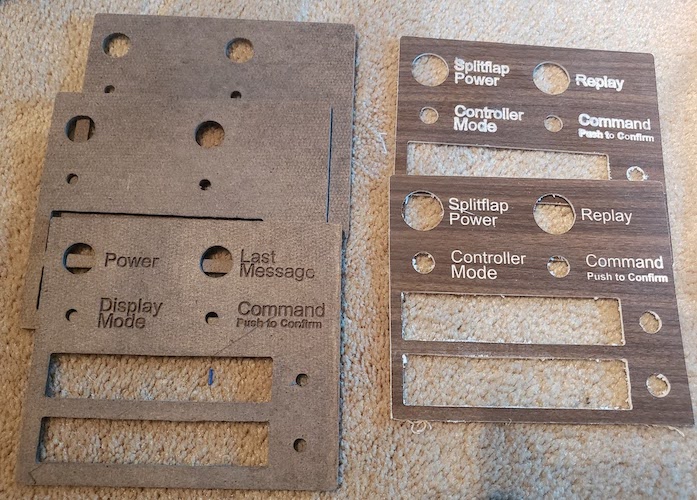
After I got the component spacing just right with the masonite trials on left, I started engraving with the plastic on right. It took a few trials: the plastic is both incredibly flexible and with tight tolerances for the thickness of the faux walnut, any bow in the underlying CNC table or flutter in the plastic if not held down firmly causes uneven characters.
The pan/tilt proof-of-concept, and the first attempt at the laser holder. So that the lasers can all point at approximately the same location on the dome despite being in different locations, those three holes each tilt towards the center at an angle of about seven degrees.
These plates hold the lasers in place without resorting to glue; it took several trials because the holes had to be small enough to catch the lip of the laser but large enough to avoid blocking any part of the lens.
I refresh my PHP and Javascript knowledge, learn some CSS basics, and tweak the web server that came with the base image from adbsexchange. I learn about MOSFETs, I get accounts on the Arduino, adbsexchange, and StackExchange community forums for help as I get stuck with bluetooth, with C, and with the radio receiver.
And I start learning just enough about the circuit board modules, wireless recharging, and lithium batteries. I read up on geospatial equations to calculate the minimum forecasted distance between a trajectory and a stationary point (i.e.: what’s the closest distance a plane will come to my home; this is the messiest math I have done in a while, which you can try to follow in the IntersectionForTwoPaths function here).
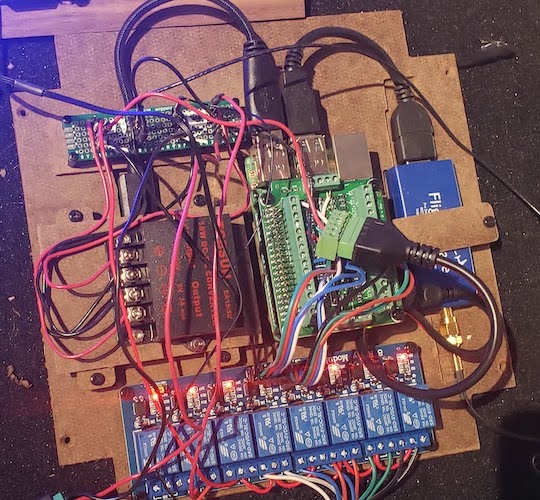
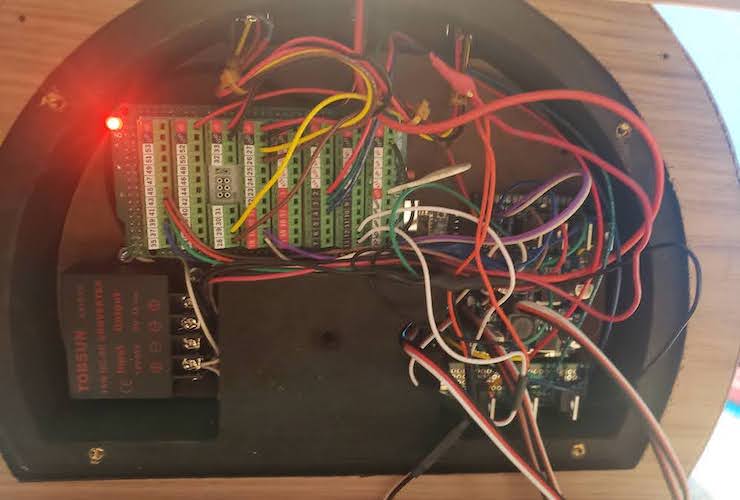
The innards of the central processor. The Raspberry Pi is underneath the green circuit board in the center; the power regulator is the black box on the left, and the radio is the blue box on the right. The bank of relays along the bottom switch the 12v indicator lights on and off, as well as control the internal fan. Hidden underneath the power supply is the 500GB SSD backup drive.
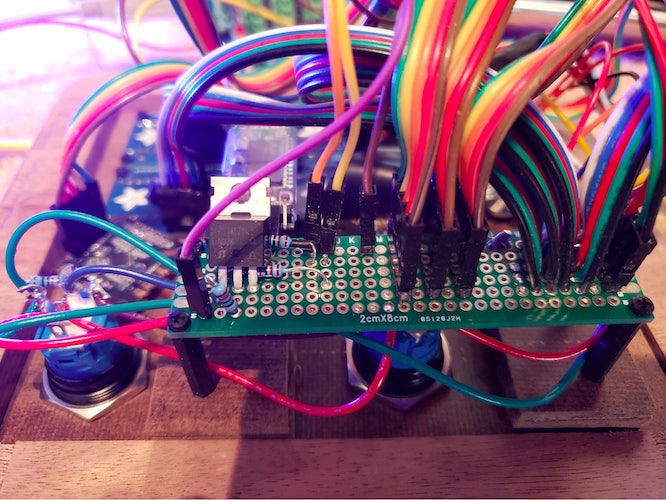
The underside of the remote control with all the switches and alphanumeric displays; though I used breadboard circuitboards to try to keep the wiring cleaner, I clearly have a lot still to learn in this domain!
The underside of the hemisphere; you can make out the power converter in the lower left, and the Arduino at top. On the right is a custom circuit board with seven mosfets (for the RGB lasers, the RGB LEDs, and the bluetooth radio) and two more DC-DC buck converters.
Finding the exactly right parts and sourcing them has been a lot of fun. But, perhaps needless to say, I have a whole bunch of “wrong” parts in my workshop now which may find their way into future projects!
For days, weeks, months, I code, primarily in python on the Raspberry Pi. The Arduino microcontrollers powering the remote control and the laser tracking hemisphere are coded in C; there’s a modest amount of shell scripting to manage errors and backups and restarting. And of course, the aforementioned PHP, Javascript, and CSS to present the pretty pages you’re looking at now.
There are a few pesky persistent bugs, and more than one “oh shit” moment when I realize when, due to lack of good planning (and scope management) at the start, I need to refactor major chunks of the code.
But my greatest struggle is in ensuring stable bluetooth connections between the Raspberry Pi and the two Arduino’s; using the inexpensive HC-05 modules and the RPi’s built-in bluetooth capabilities, I struggle to keep a connection for more than thirty minutes. I receive lots of advice on a few engineering forums - all given in good faith, and some of it even useful - ranging from power supply, wiring schematics, code libraries, and physical hardware.
This came to a head in trying to install a new bluetooth library - the installation somehow completely hoses my Raspberry Pi. Fortunately, one of my scope creep line items as the project got more complicated was a nightly full backup to a flash drive attached directly to the Raspberry Pi. Though the backups seemed to be happening, I hadn’t yet had to try out the restoration process. Lacking experience with that, or with the Unix filesystem, though I was able to save the code I had written, I wasn’t able to restore the RPi overall. That meant the dozens of libraries and hundreds of configuration adjustments had to be reconstituted from scratch. Two stressful days later, I finally get back to a working system.
Following that nightmare experience, I adjust some of the code making the backups, and I also provide a little more documentation (and practice) for myself. Restorations from backups - which I’ve had to do a few times since - are now little more than a twenty minute hassle.
And one of the final and more exciting integrations was integrating with the Vestaboard; at the beginning of 2020, though the company had shared progress in their design and manufacturing, it was still mostly promises. But by early April, they had completed the developer portal and the simulator you see here, which gave me both a wonderful demo and the ability to validate one more integration. It was here that I also first became aware, however, that - for cost and weight reasons - the board was shrunk from 7 lines x 23 characters to 6 lines x 22 characters. A small tweak, perhaps, but losing 18% of my real estate forced me to rejigger a few of the display attributes.
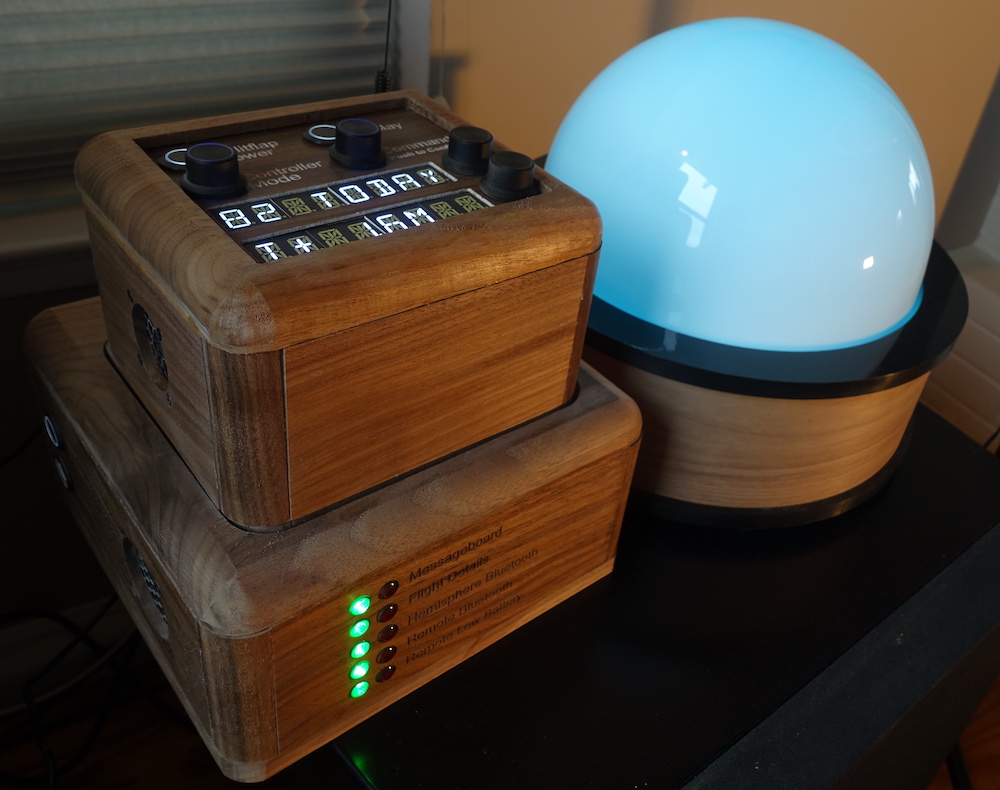
With all the electrical and mechanical components finally in place, and the custom solid walnut and veneered cases built, wired, and tested, I’m excited to be in a position to be able to finally share elements of this “installation art piece” with you as well. Of course, I want to share photos and videos of the (nearly) finished pieces.
I've kept the fronts of each of the three components fairly clean, placing the temperature-triggered fans and the vents on the sides.
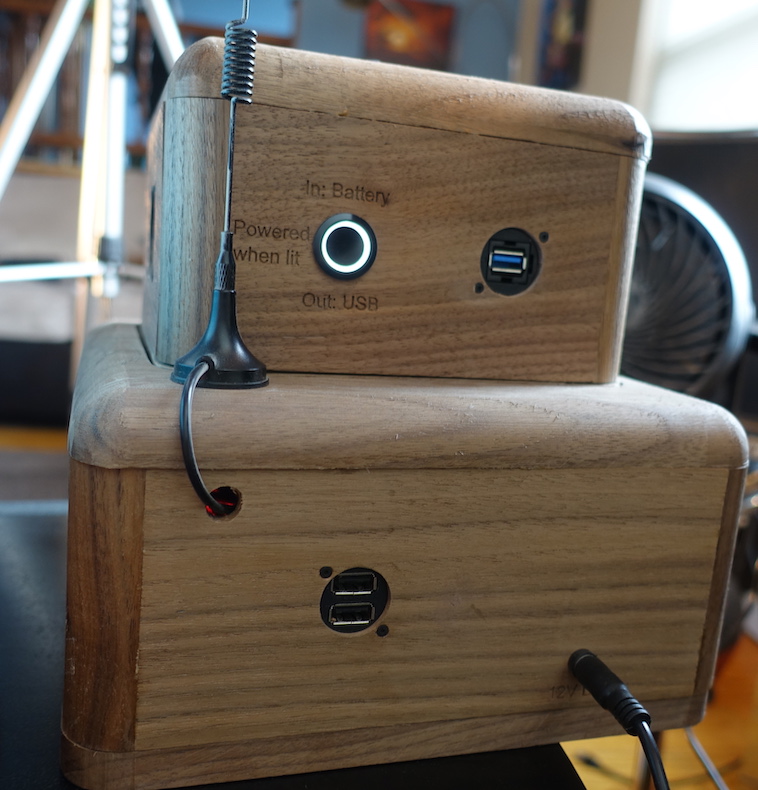
From the back, you can see the ports for debugging or reprogramming, and the DC-jack for the main controller. The remote control is typically powered via the internal battery, but can alternatively be powered by the USB port.
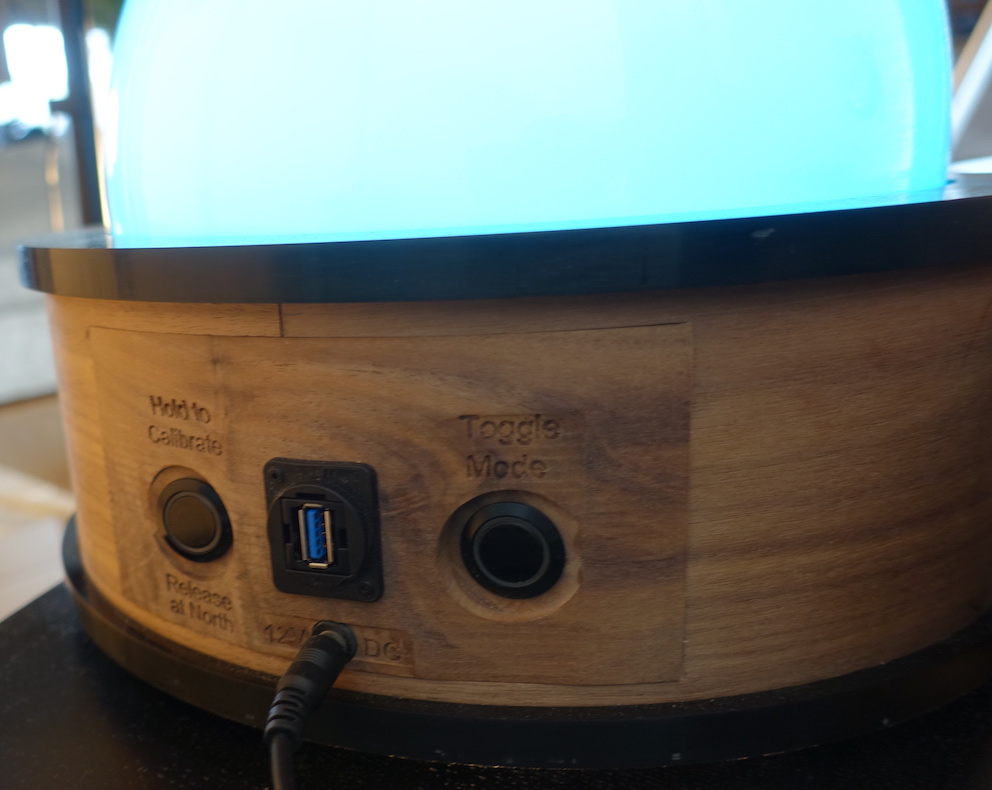
The back of the hemisphere holds a solid walnut insert with cutouts to calibrate the lasers to north and to switch the lamp mode to be only a decorative lamp, only a laser tracker, or both. The rest of the dome is walnut-veneered MDF.
What's still left to do? A few small details: I haven't yet applied a finish to all the cases; and I have to find a solution to a pesky heat problem caused by the high-power inductive charger. That heat problem was a bit of a surprise: I have set the internal fan to turn on when the processor hits 65C, well below the 85C temperature at which the Raspberry Pi self-throttles; during my months of testing, which didn't include the charger, the fan was never triggered and so I was prepared to create some artificial tests to make sure it worked! But after leaving the final assembly running for a few hours, I checked the status and saw that the fan cycled almost every five minutes (turning off at 55C). I'll probably add a large heatsink to the charger circuit board, and cut one or two more holes in the case sides to allow for more passive cooling.(and turn off at 55C).
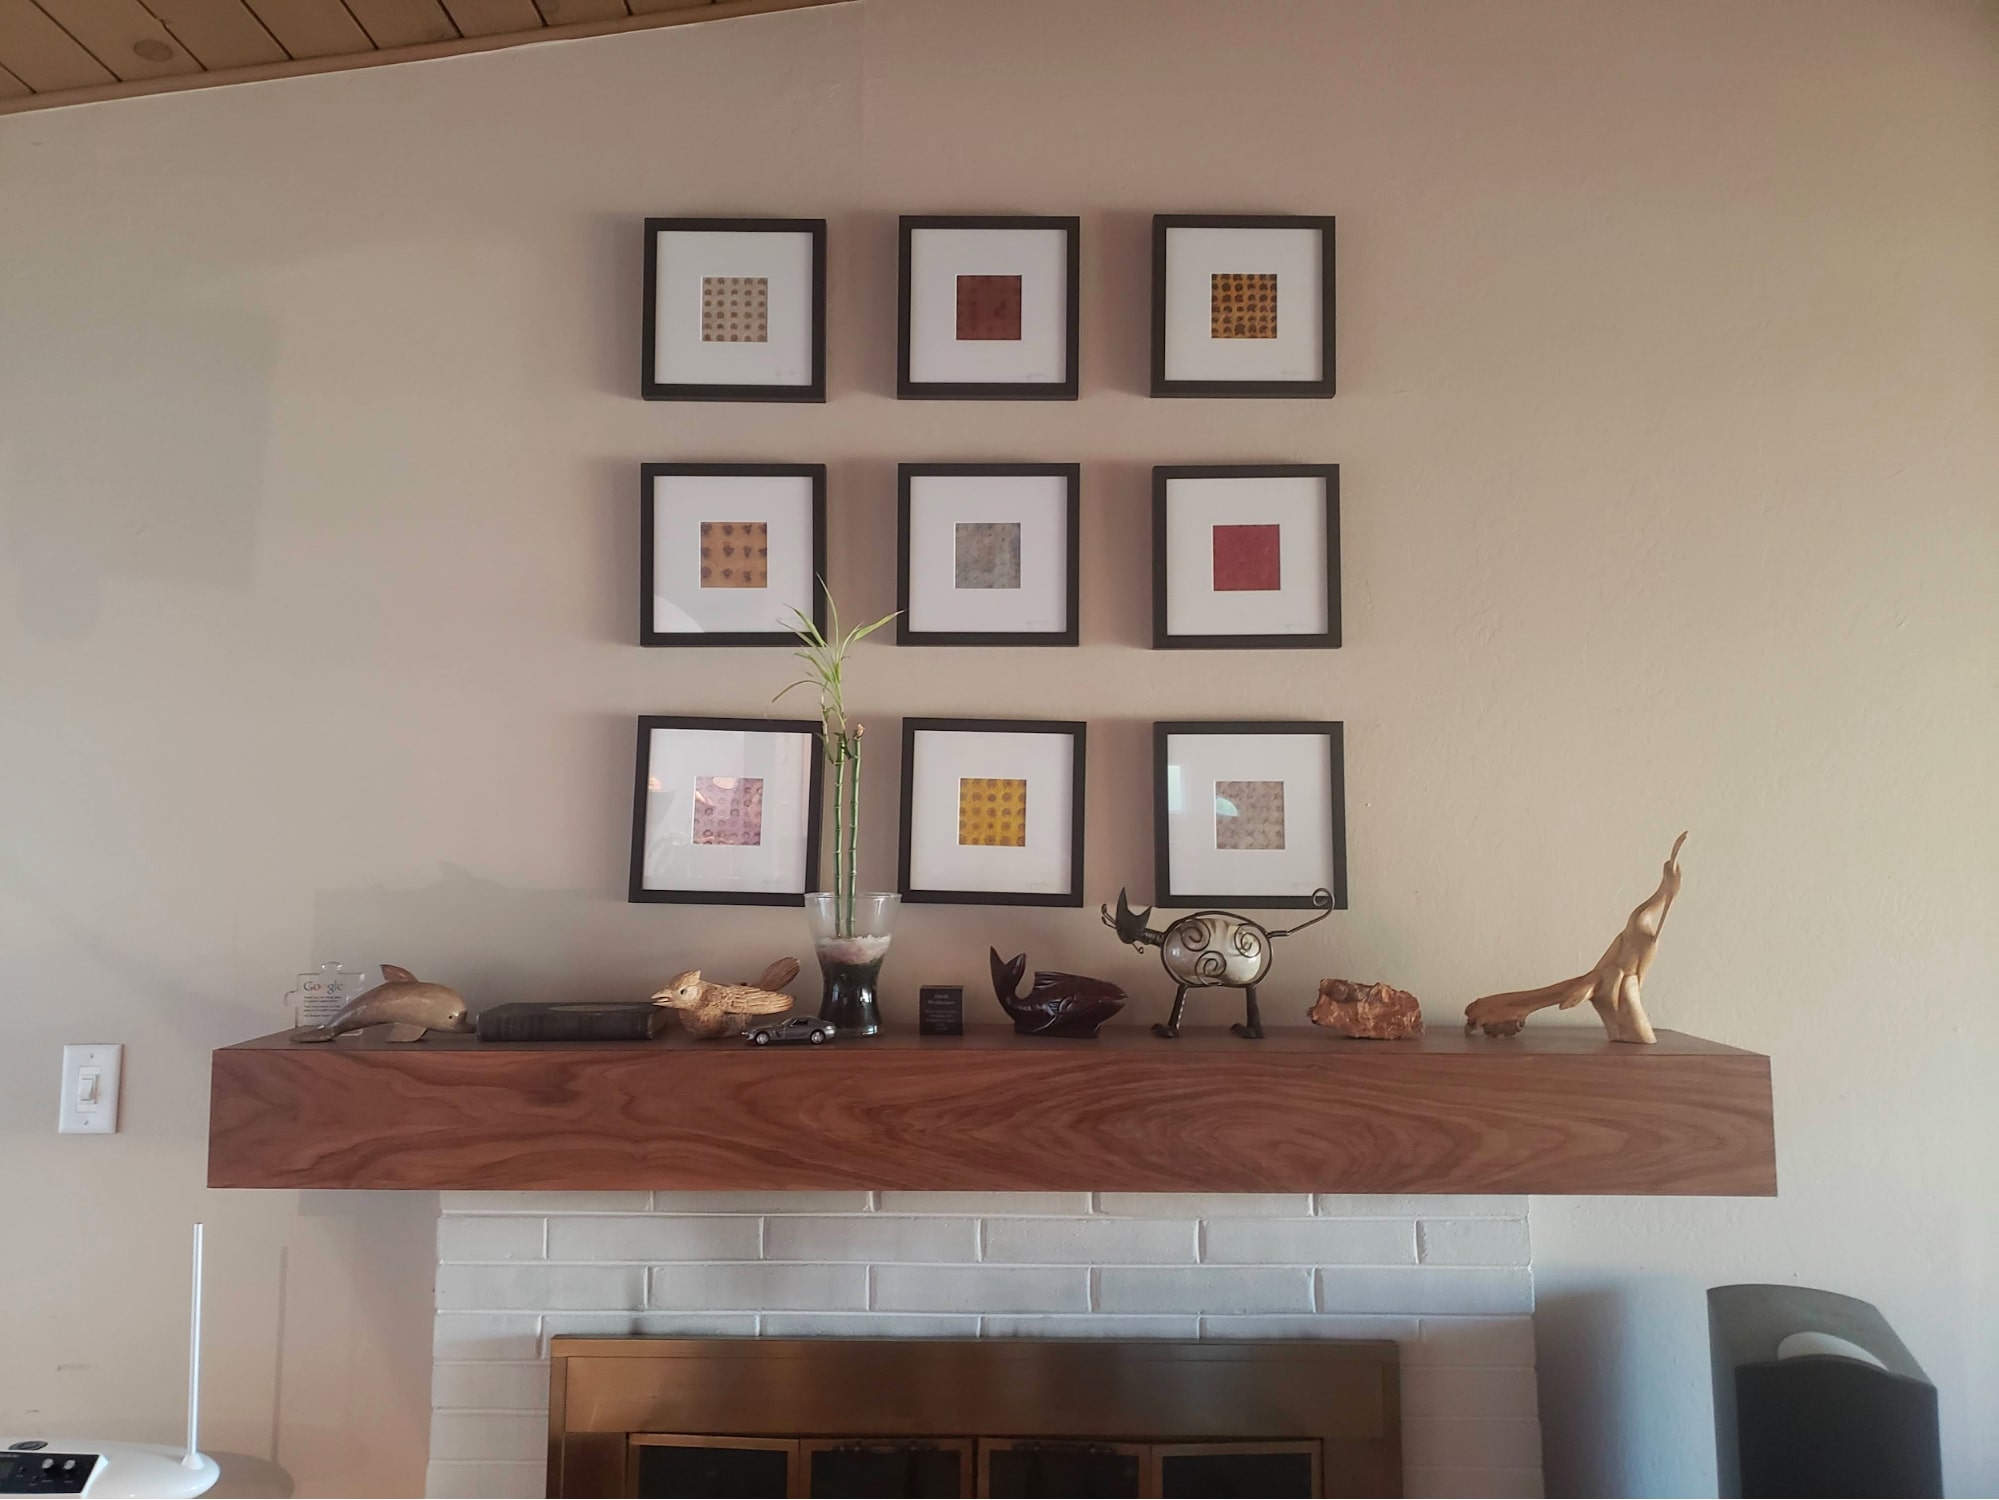
I’m still awaiting the physical Vestaboard splitflap display. Of course, once that arrives, it will get a prominent location above my mantle, replacing the pieces that have hung there since 2005. At that point, I’ll update this post with some new pictures and videos.
A project like this is never fully done.
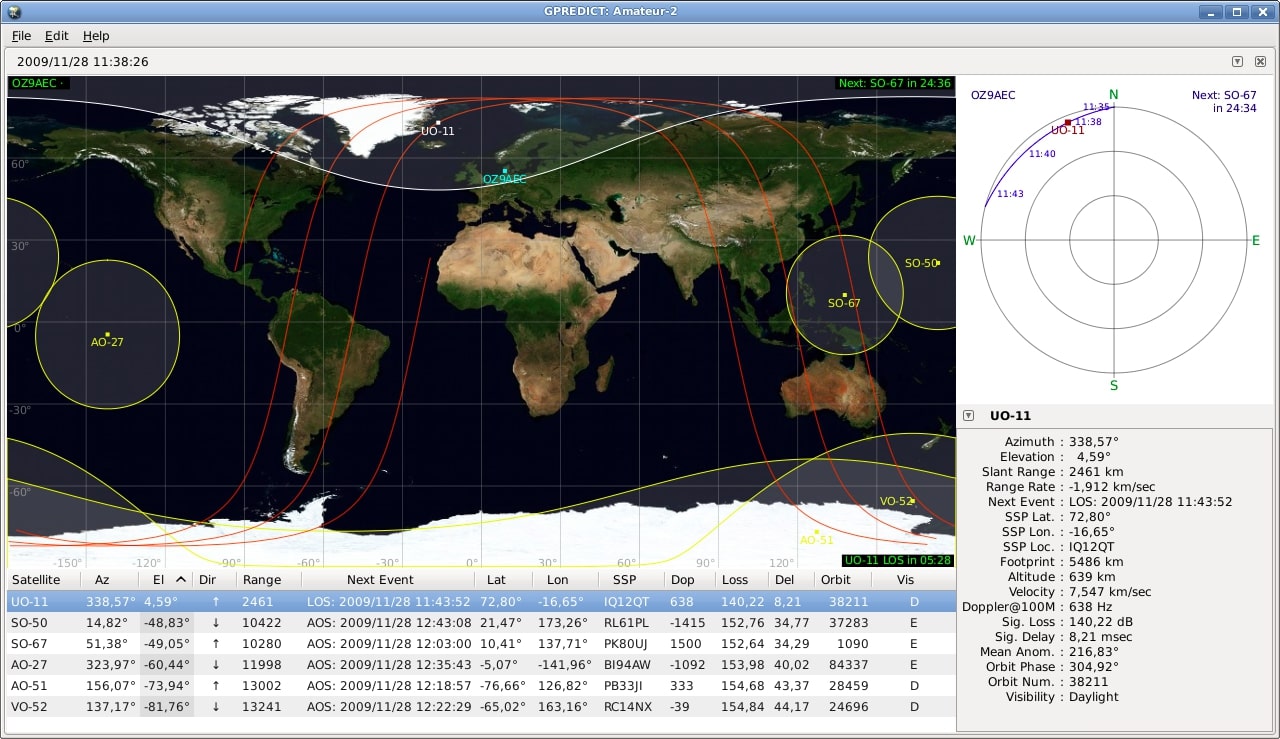
One area I’d like to incorporate is satellite information - there are some good open source applications and repositories for satellite trajectories, but I haven’t yet found an easy-to-use python library (vs. an entire application for which I would have to reverse engineer some of the elements).
A few friends have mentioned that I should sell “this”, albeit I’m not sure what it is that I’d be selling. With some past career experience touching on software support, I definitely do not want to get into that tar pit! And though many of the wood case elements were CNCd so the milling is now more easily repeatable with a design in place, the assembly and wiring harnesses have been a labor of love that I similarly do not want to repeat - or troubleshoot - with clients. So I think this will be a bespoke installation existing only in South San Francisco.
I’d love to hear your thoughts on crazy new features to add - please help me feed the scope creep monster - who knows where it will go? Afterall, I can trace this whole project back to a simple question in 2018 from a customer about a Nixie clock; your question or comment could lead to another months-long exploration an interesting blog post, or perhaps even change the world!
Take a look around! Much of it is self-explanatory, but if you prefer a guided tour:
Home
Intro: This page, of course
Simulator: Vestaboard-implemented simulation of how the latest message will be rendered on the board.
Messages: A rolling history of the most recent messages.
Histogram: There are about a dozen histograms that are updated nightly based on the last thirty days of flight history. You can pick up interesting patterns: gradual shifts in the number of flights, brief shifts in flight quantity due to weather patterns, etc.
Radio Details: The two tabs here show live data from the radio receiver, one in map form, and the other as a performance dashboard over a longer time horizon.
System Health
Status: Shows the failure frequency and cause for each of the main subsystems, along with links to the code that was running at the time, for the last 24 hours.
Code History: Shows the entire python code history since early April, 2020, including the number of lines changed between each version.
Settings: This is password protected to ensure that you don’t broadcast obscene messages into my living room (and to keep the system healthy)
General: User controls for flight sensitivity, system management, server rebooting, Arduino testing, and the like; you can see a disabled version here including all the tool tips.
Vestaboard: Configuration of the web services that control the simulator and the physical board.
Logs: Also password protected, these help me with the troubleshooting and make sure everything is running well.
Restarts: A cronjob checks for a hung process every fifteen minutes, and checks for a running process every minute, logging when intervention is needed.
Mon 06 Jul 2020 07:45:14 PM PDT - messageboard.py was hanging so system rebooted
Mon 06 Jul 2020 07:46:28 PM PDT - messageboard.py was not running and has been started again!
Wed 08 Jul 2020 08:18:03 PM PDT - messageboard.py was not running and has been started again!
Backups: A cronjob copies a backup of the entire system nightly onto a tethered 500GB SSD drive.
Tue 07 Jul 2020 02:41:02 AM PDT - backup completed at /mnt/backup/daily/07-07-2020.img
Wed 08 Jul 2020 02:41:31 AM PDT - backup completed at /mnt/backup/daily/07-08-2020.img
Errors: Unhandled python exceptions are logged here.
Main: The log for the main python process of the Raspberry Pi interacting with the radio and the splitflap display.
================================================================================
2020-07-07 20:01:28.477501-07:00
Finishing initialization of 1134; starting radio polling loop
================================================================================
2020-07-07 20:01:28.494814-07:00
Process for <function RemoteMain at 0x7328a078> starting for first time
================================================================================
2020-07-07 20:01:28.533231-07:00
Process for <function ServoMain at 0x73289c00> starting for first time
================================================================================
2020-07-07 20:06:19.895611-07:00
No json from Flightaware for flight SWA1939: Unable to query FA for URL due to HTTPSConnectio
nPool(host='flightaware.com', port=443): Max retries exceeded with url: /live/flight/SWA1939
(Caused by NewConnectionError('<urllib3.connection.VerifiedHTTPSConnection object at 0x6dbe35
b0>: Failed to establish a new connection: [Errno -3] Temporary failure in name resolution'))
: https://flightaware.com/live/flight/SWA1939
================================================================================
2020-07-07 20:06:30.043905-07:00
curl.perform() failed with message (28, 'Resolving timed out after 3000 milliseconds')
================================================================================
2020-07-08 01:18:48.090442-07:00
Flight (EVA027; 3212) is overwriting the prior recorded flight (EVA027; None) due to updated
identifiers
================================================================================
Arduino: The log for the dependent python processes of the Raspberry Pi interacting with the Arduinos.
================================================================================
2020-07-08 08:06:16.617878-07:00
ARDUINO: Handshake error with Remote on attempt 1: [Errno 5] Input/output error
================================================================================
2020-07-08 08:06:18.622940-07:00
ARDUINO: Handshake received at Remote by receipt of bytes [0, 1, 136, 19, 200, 175, 0, 0, 0,
0, 159, 5, 30, 0, 0, 0, 0, 0, 0, 0, 0, 0, 1]
================================================================================
2020-07-08 20:00:53.416118-07:00
Servo: Flight changed from BAW6B to SWA1476
================================================================================
2020-07-08 20:17:02.010659-07:00
Servo: Shutdown requested
================================================================================
2020-07-08 20:18:20.057548-07:00
ARDUINO: Process started with process id 1366
================================================================================
2020-07-08 20:18:20.085997-07:00
ARDUINO: Process 1366 (Servo) initialized into error state
================================================================================
2020-07-08 20:18:21.149733-07:00
ARDUINO: sudo rfcomm bind 2 28:D9:41:AC:42:26 1 completed
================================================================================
2020-07-08 20:18:24.790769-07:00
ARDUINO: Handshake received at Servo by receipt of bytes [2, 0, 0, 0]
Serials: When enabled, every serial message sent or received with the Arduinos. Ordinarily, that’s about 22 messages a second, or 1320 messages a minute, so it would both fill and corrupt the memory on the RPi if left on, so it’s only enabled when troubleshooting.